Adobe CC Download: So you’re ready to dive into the world of Photoshop, Illustrator, and all those other awesome Adobe apps? Getting started is easier than you think! This guide breaks down everything you need to know about downloading Adobe Creative Cloud, from choosing the right download method to troubleshooting those pesky errors. We’ll cover everything from system requirements to optimizing download speeds, making sure you’re up and running in no time.
Table of Contents
Whether you’re a seasoned pro or a complete newbie, this guide will walk you through the entire process, offering tips and tricks along the way. We’ll even tackle those common issues that can sometimes throw a wrench in the works. Get ready to unleash your creativity!
Understanding Adobe CC Download Options
So, you’re ready to dive into the world of Adobe Creative Cloud? Awesome! But before you start designing logos or editing videos, you need to get the software downloaded. There are a few different ways to do this, each with its own pros and cons. Let’s break down your options.
Choosing the right download method depends on your internet connection speed, available storage space, and personal preference. Factors like your computer’s specifications also play a role in determining the optimal download approach.
Adobe Creative Cloud Desktop Application Download
This is the most common and generally recommended method. The Creative Cloud desktop app acts as a central hub for all your Adobe applications. It manages updates, installations, and uninstalls, keeping everything organized. The app itself is a relatively small download, and then you can choose which individual applications you want to install. This approach is ideal for users who plan to use multiple Adobe applications or need to manage their software regularly.
System requirements are minimal; you’ll need a reasonably modern computer with enough disk space for the applications you intend to install. Download speeds are generally fast, as the app manages the download process efficiently, often optimizing for your connection. Think of it like a smart download manager tailored specifically for Adobe software.
Direct Download from Adobe Website
You can also download individual Adobe CC applications directly from the Adobe website. This option is useful if you only need one specific program, like Photoshop or Illustrator, and don’t want to install the entire Creative Cloud suite. This bypasses the Creative Cloud desktop app entirely.
System requirements are the same as for the desktop app method; the minimum specifications are listed on Adobe’s website for each individual application. Download speeds can vary depending on your internet connection and the size of the application. Generally, direct downloads might be slightly slower than the optimized downloads managed by the Creative Cloud desktop app because they lack the app’s download management features.
Download Speed Comparison
Generally, the Creative Cloud desktop application offers faster download speeds compared to direct downloads from the Adobe website. This is because the desktop application uses optimized servers and download management techniques, often resuming interrupted downloads and prioritizing speed based on your connection. Direct downloads can be slower, especially for larger applications, and might be more susceptible to interruptions. Think of it like ordering a large meal – the delivery service (Creative Cloud app) is often faster and more reliable than going to pick it up yourself (direct download).
The difference might not be dramatic for users with fast, stable internet connections, but it can be significant for those with slower or less reliable connections.
Navigating the Adobe CC Download Process
So, you’ve got your Adobe Creative Cloud subscription all set up – congrats! Now comes the fun part: downloading all those awesome apps. This process is pretty straightforward, but we’ll walk you through it step-by-step to make sure you don’t get lost in the digital wilderness. We’ll cover downloading the Creative Cloud desktop app and then grabbing individual applications from within it.The Adobe Creative Cloud desktop application acts as your central hub for managing all your Adobe CC software.
It handles downloads, updates, and even lets you manage your storage space. Getting familiar with this app is key to a smooth workflow.
Downloading Adobe CC Using the Desktop Application
First, you’ll need to download and install the Creative Cloud desktop app itself if you haven’t already. This is usually done through your browser by visiting the Adobe website and signing in to your account. Once installed, you’ll see a familiar icon in your system tray (Windows) or menu bar (Mac). Launching the app will bring you to your Creative Cloud dashboard.
From there, you can browse the available apps. To download an application, simply locate it in the list of available applications, and click the download button. A progress bar will appear, indicating the download’s progress. After the download is complete, the application will be automatically installed. You might need to restart your computer for the changes to take full effect, but the app will usually guide you through this process.
Downloading Specific Applications Within Creative Cloud
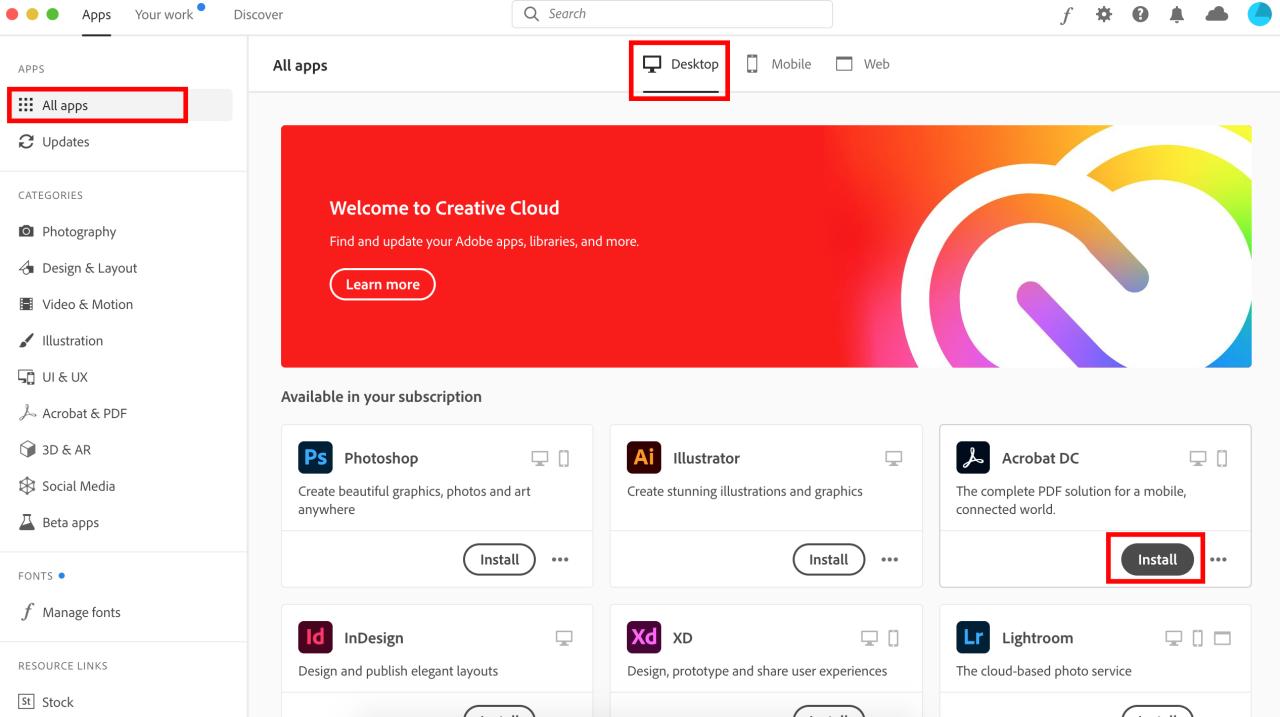
Once the Creative Cloud desktop application is installed and running, downloading individual applications is a breeze. The Creative Cloud app displays a library of all the apps included in your plan. You can easily search for specific applications using the search bar. Clicking on the app’s icon will show you more information about it, including system requirements.
Then, simply click the “Install” or “Download” button (the wording might vary slightly depending on the app and your operating system). The download and installation process will begin, showing a progress bar. After the installation is complete, you’ll find the app listed among your installed applications and ready to launch. For example, if you only need Photoshop, you can simply download and install Photoshop without downloading Illustrator or InDesign if you don’t need them at the moment, saving you storage space and download time.
A Flowchart Illustrating the Adobe CC Download Process
Imagine a flowchart with rectangular boxes representing actions and diamond-shaped boxes representing decisions.
1. Start
The process begins with the user accessing their Adobe Creative Cloud account through a web browser or existing desktop app.
2. Login
The user enters their Adobe ID and password. A successful login proceeds to the next step, while an unsuccessful login requires the user to re-enter credentials or troubleshoot login issues.
3. Creative Cloud Desktop App
If the user doesn’t have the Creative Cloud desktop app installed, they’ll be prompted to download and install it. This involves accepting terms and conditions and allowing necessary permissions.
4. App Selection
The user browses the available applications within the Creative Cloud app and selects the application they wish to download.
5. Download & Install
The selected application begins downloading and installing. A progress bar indicates the download and installation progress.
6. Launch Application
Once the download and installation are complete, the user can launch the application.
7. End
The process concludes with the user successfully launching the application. Any errors encountered during the download or installation process will be indicated, prompting the user to troubleshoot the problem.The flowchart would visually represent this sequential process, making the steps clear and easy to follow. The branching path for login success/failure and the installation process adds a layer of complexity that a simple linear sequence wouldn’t capture.
Troubleshooting Common Download Issues

So, you’re trying to download Adobe Creative Cloud, but things aren’t going as smoothly as a perfectly rendered animation. Don’t worry, download hiccups happen to the best of us. This section covers common problems and their solutions, getting you back to creating awesome stuff in no time. We’ll cover error codes, slow speeds, and connection issues.
Troubleshooting Adobe CC downloads often involves a process of elimination. Start with the simplest solutions and work your way through the more complex ones. Remember to check your internet connection, restart your computer, and check for any Adobe Creative Cloud application updates before diving into more advanced troubleshooting steps.
Slow Download Speeds or Connection Problems
Slow downloads can be incredibly frustrating. Several factors can contribute to this, including network congestion, server issues on Adobe’s end, and problems with your own internet connection. The first step is to identify the bottleneck. Is your entire internet slow, or is it just Adobe Creative Cloud? Try downloading something else to see if the problem is widespread.
If it’s isolated to Adobe CC, check your firewall settings to ensure that the Adobe Creative Cloud application isn’t being blocked. Also, temporarily disable any VPN or proxy servers you might be using. If you’re on a shared network, consider if others are using a significant amount of bandwidth. Restarting your modem and router can often resolve temporary network glitches.
Common Error Codes and Solutions
Encountering error codes during the download process can be confusing. Understanding what these codes mean is key to finding a solution quickly. The following table Artikels some common errors and their solutions. Remember that specific error codes can vary slightly depending on your operating system and the version of Adobe Creative Cloud you’re downloading.
| Error Code | Meaning | Recommended Fix | Additional Notes |
|---|---|---|---|
| 190 | Download failed due to an unknown error. | Restart your computer and try again. Check your internet connection and firewall settings. If the problem persists, try clearing your browser’s cache and cookies. | This is a general error, so systematic troubleshooting is needed. |
| 100 | Download interrupted or incomplete. | Resume the download if possible. If not, delete the partially downloaded file and start again. Ensure sufficient disk space is available. | Ensure the download location has enough free space. |
| 101 | Server error. | Try again later. Adobe’s servers may be experiencing temporary issues. | This often resolves itself after a short period. Check Adobe’s system status page. |
| 200 | Connection timeout. | Check your internet connection and ensure you’re not behind a firewall or proxy that’s blocking the download. | Consider temporarily disabling firewalls and VPNs for troubleshooting. |
Managing Downloaded Adobe CC Applications
So you’ve successfully downloaded Adobe Creative Cloud apps – congrats! Now, let’s talk about keeping them running smoothly and efficiently. Managing your Adobe CC applications involves keeping them updated, knowing how to remove them if needed, and understanding how to keep your hard drive from getting clogged with gigabytes of files.Keeping your Adobe CC apps up-to-date is crucial for accessing the latest features, performance improvements, and critical security patches.
Regular updates ensure a smoother workflow and protect your system from vulnerabilities. Outdated software can lead to compatibility issues and unexpected crashes.
Updating Adobe CC Applications
Adobe Creative Cloud’s built-in updater handles most of the heavy lifting. The Creative Cloud desktop app usually notifies you when updates are available. You’ll typically see a notification badge or a message prompting you to update. Clicking the notification will initiate the update process, which downloads and installs the new version of your chosen application(s) automatically. You can also manually check for updates by opening the Creative Cloud desktop app and going to the Updates section.
The app will then scan for available updates and allow you to choose which apps to update. Sometimes, you might need to restart your computer after an update to fully implement the changes.
Uninstalling or Removing Adobe CC Applications
Removing an Adobe CC application is generally straightforward. The simplest method is through the Creative Cloud desktop app itself. Locate the application you want to uninstall in your applications list within the Creative Cloud app. Select it, and you’ll usually find an “Uninstall” or similar option. The app will guide you through the uninstallation process.
Alternatively, you can uninstall apps using your operating system’s built-in uninstaller. For Windows, this is usually found in the Control Panel; for macOS, it’s in the Applications folder. However, using the Creative Cloud app’s uninstaller is generally preferred as it ensures a cleaner removal and avoids leaving behind leftover files that could cause problems later.
Best Practices for Managing Disk Space Used by Adobe CC Applications
Adobe CC applications, especially those that deal with large files like Photoshop and Premiere Pro, can consume significant amounts of disk space. Proactive management is key to avoiding storage issues.
Here are some key strategies:
- Regularly clear your cache and temporary files: Many Adobe apps create temporary files during operation. These files can accumulate over time, consuming unnecessary space. Most applications have built-in options to clear cache and temporary files. Failing that, your operating system likely has utilities to help.
- Uninstall unused applications: If you’re not using an Adobe CC app, uninstall it. This frees up considerable space, especially if you have several apps installed that you rarely use.
- Move project files to an external drive: Large project files can quickly fill your hard drive. Storing your project files on an external hard drive or cloud storage solution frees up valuable space on your primary drive.
- Use cloud storage: Services like Creative Cloud storage, Dropbox, or Google Drive allow you to store your project files online, keeping them accessible while freeing up local storage. This is particularly useful for large projects or if you work on multiple computers.
- Monitor disk space regularly: Use your operating system’s tools to regularly check your disk space usage. This proactive approach will allow you to identify potential issues before they become critical.
Adobe CC Subscription and Download Access: Adobe Cc Download
Understanding your Adobe Creative Cloud (CC) subscription is key to accessing and managing your downloaded applications. Different subscription plans offer varying levels of access, affecting which apps you can download and how many devices you can install them on. This section clarifies the intricacies of Adobe CC subscription plans and their download privileges.
The download process itself is generally straightforward once you’ve got the right subscription. After signing in to your Adobe account, you’ll typically find a Creative Cloud desktop application which acts as your central hub for managing downloads, updates, and installations. However, the specific apps available for download and the number of devices allowed will depend entirely on your chosen subscription plan.
Adobe CC Subscription Plans and Download Privileges
Adobe offers several subscription plans, each catering to different needs and budgets. The core differences lie in the number of applications included, the features available within those applications, and the number of devices you can install the software on. For example, the most basic plan might only include Photoshop and Illustrator, while a more comprehensive plan might include the entire suite of applications.
Similarly, the number of devices you can install the software on may vary significantly.
It’s important to carefully review the details of each plan before subscribing to ensure it aligns with your individual requirements. Adobe’s website provides detailed comparisons of all their subscription options. Consider factors such as your workload, the specific applications you need, and the number of devices you use regularly when making your selection.
Accessing Downloads with Different Subscription Types
The process of accessing downloads remains relatively consistent across different subscription types. After subscribing, you’ll typically log into your Adobe account through the Creative Cloud desktop application. This application acts as a central hub where you can browse available applications based on your subscription, select those you wish to download, and manage installations across your permitted devices. The main difference lies in
which* applications are available for download; a Photography plan will not offer access to After Effects, for instance.
Many plans also offer cloud storage, allowing you to save and access your project files from multiple devices. This feature isn’t directly tied to the download process itself, but it’s a crucial element of the overall Adobe CC experience and works seamlessly with the downloaded applications.
Feature and Limitation Comparisons Regarding Downloads
| Subscription Type | Number of Apps | Devices Allowed | Cloud Storage | Download Limitations |
|---|---|---|---|---|
| Photography Plan | Limited (e.g., Photoshop, Lightroom) | Typically 2 | Variable (e.g., 100GB, 200GB) | Only apps included in the plan are downloadable. |
| All Apps Plan | All Adobe CC applications | Typically 2 (may vary with additional purchases) | Variable (e.g., 100GB, 200GB) | No limitations beyond the number of devices. |
| Single App Plan | One specific application (e.g., only Photoshop) | Typically 2 | Limited or None | Only the selected application is downloadable. |
Note that these are examples, and specific features and limitations can change. Always refer to Adobe’s official website for the most up-to-date information on their subscription plans.
Security Considerations for Adobe CC Downloads
Downloading Adobe Creative Cloud software is a pretty common thing, but it’s crucial to remember that you’re dealing with powerful software, and security should always be top of mind. Getting the legit version from the right place and protecting your system during the download and installation process are key to avoiding nasty surprises. Let’s dive into some best practices to keep you safe.Downloading Adobe CC from unofficial sources can expose your system to malware, viruses, or even scams designed to steal your personal information.
Always download directly from Adobe’s official website. This ensures you’re getting the authentic software, free from any malicious code. The integrity of the software is paramount for both functionality and security. Remember, downloading from untrusted sites could compromise your entire system.
Verifying the Download Source
The most important step in securing your Adobe CC download is verifying the source. Always navigate directly to Adobe’s official website (www.adobe.com) to initiate your download. Be wary of links from emails, social media posts, or other unofficial channels, as these may lead to malicious websites disguised as legitimate Adobe download pages. Check the URL carefully – look for the “https” prefix and the official Adobe domain name.
A legitimate Adobe download page will have clear branding, a secure connection, and instructions directly from Adobe. Avoid any sites that look suspicious or unprofessional.
Protecting Against Malware During Download and Installation
Once you’ve confirmed the download source, there are still steps you can take to protect your system. Ensure your antivirus software is up-to-date and running before starting the download. Real-time protection can help detect and block any malicious code that might try to sneak in. After the download is complete, scan the installer file with your antivirus before running it.
This extra layer of protection provides an added measure of security. Furthermore, always pay close attention to the installation process itself. Avoid clicking on anything suspicious or unexpected that appears during the installation. If something seems off, stop the installation and re-download the software from the official Adobe website. It’s better to be safe than sorry.
Adobe CC Download on Different Operating Systems
Downloading and installing Adobe Creative Cloud applications varies slightly depending on whether you’re using a Windows or macOS machine. While the core process remains similar, there are some key differences in system requirements, potential conflicts, and troubleshooting steps. Understanding these nuances ensures a smoother installation and optimal application performance.The primary differences lie in the file system structures, application management tools, and common software conflicts encountered on each operating system.
Both systems generally offer a straightforward download and installation process through the Creative Cloud desktop application, but specific steps and potential issues vary.
Windows System Requirements and Considerations
Windows users should ensure their system meets the minimum specifications Artikeld by Adobe for the specific Creative Cloud applications they intend to install. This typically includes sufficient RAM, hard drive space, and a compatible graphics card. Older Windows versions might require specific updates or service packs to support the latest Adobe CC releases. For example, Adobe might require Windows 10 or 11 for optimal performance with newer versions of Photoshop or Premiere Pro.
So, you’re trying to snag that Adobe CC download? Totally get it; those apps are essential. But before you dive in, think about how you’ll manage all those projects. Check out clio manage for a solid project management system to keep things organized. Then, once you’ve got your workflow down pat, you can really focus on maximizing that Adobe CC download and unleashing your creative potential!
Insufficient RAM is a common cause of sluggish performance or crashes, while insufficient hard drive space prevents installation altogether. Checking your system specifications before downloading is crucial.
macOS System Requirements and Considerations
Similar to Windows, macOS users must confirm their system meets the minimum requirements specified by Adobe. macOS versions have a significant impact on compatibility. Older versions of macOS may not support the latest Adobe CC applications, resulting in installation failures. For example, some features in After Effects might require macOS Monterey or later. The available disk space and RAM are also crucial factors affecting performance.
A lack of available disk space can hinder installation and cause errors, while insufficient RAM can lead to application instability.
Windows System Conflicts and Solutions
Conflicts on Windows can arise from incompatible drivers, outdated software, or conflicting applications. For example, an outdated graphics driver might cause rendering issues in Photoshop. The solution usually involves updating the drivers to their latest versions. Sometimes, conflicts with antivirus software can interfere with the installation process; temporarily disabling the antivirus during installation can resolve this. Another common issue is conflicting library files, requiring a clean reinstallation of Adobe CC after uninstalling any conflicting applications.
Using the Adobe Creative Cloud Cleaner Tool can help remove stubborn remnants of previous installations.
macOS System Conflicts and Solutions, Adobe cc download
macOS system conflicts often stem from permission issues, conflicting extensions, or outdated system software. Permission issues can be resolved by running the Creative Cloud installer with administrator privileges. Conflicting extensions, particularly those that manage file associations, might interfere with Adobe applications. Disabling or uninstalling these extensions might resolve the problem. Similar to Windows, outdated system software can cause compatibility issues.
Keeping the macOS system up-to-date with the latest updates and security patches is vital. A clean reinstallation of Adobe CC, after removing any conflicting applications, is sometimes necessary.
Using Adobe CC Offline
Going offline with Adobe Creative Cloud apps isn’t about completely severing ties with the internet; it’s more about working when you lack a stable connection. Think of it as a temporary, disconnected mode for those times you’re on a plane, in a remote location, or simply dealing with spotty Wi-Fi. This allows you to continue your creative flow without interruption.Adobe CC apps offer a way to work offline, but it’s crucial to understand the process and limitations involved.
Essentially, you’re working with a local copy of your files and the software, and re-synchronization with the cloud is essential to ensure everything remains up-to-date and backed up.
Offline Access Configuration
To enable offline access, you need to actively prepare your Adobe CC applications. This isn’t an automatic setting. You’ll generally find an option within the application’s preferences or settings menu, often under an “Account” or “Sync” section. The exact wording may vary slightly depending on the specific Adobe CC application you are using (Photoshop, Illustrator, Premiere Pro, etc.).
Activating this option will download the necessary components for offline use, including your synced files and project data. It’s important to ensure you’re connected to the internet when initially setting up offline access; otherwise, the process won’t work. Once configured, the software will indicate its offline status within the application interface.
Limitations of Offline Usage
While offline access is a lifesaver for those without a consistent internet connection, there are limitations. First, you’ll be working with a limited subset of your cloud documents. Only those specifically downloaded for offline use will be accessible. Secondly, some features, particularly those relying on cloud services (like collaborative editing or cloud storage-based templates), may be unavailable or limited in functionality.
Thirdly, any changes made offline will not be automatically backed up or synced until you reconnect to the internet. Finally, updating the software while offline is not possible. You must reconnect to the internet to install updates. Think of it like working on a local copy of your files; the true “master” copy resides in the cloud.
Synchronizing Offline Work
Once you regain internet access, synchronizing your offline work is crucial. This ensures your local changes are saved to the cloud, preserving your work and providing a backup. Most Adobe CC applications automatically attempt to sync upon reconnection. However, it’s good practice to manually check for sync status within the application’s settings. This is especially important after extensive offline work to ensure everything is properly updated and saved to the cloud.
Any conflicts, such as simultaneous edits from multiple devices, will typically be resolved automatically by the software, though you might be prompted to choose between different versions of the file.
Adobe CC Download Speed Optimization
Downloading Adobe Creative Cloud applications can sometimes feel like waiting for paint to dry, especially with larger applications like Photoshop or Premiere Pro. However, there are several strategies you can employ to significantly boost your download speeds and minimize that agonizing wait time. Understanding the factors that influence download speed, and implementing the right optimization techniques, can make a world of difference.Optimizing your Adobe CC download speed hinges on two key areas: your internet connection and your network configuration.
A slow internet connection is the most obvious culprit, but even with a fast connection, network congestion or poor configuration can significantly hamper download speeds. Let’s explore how to address both.
Internet Connection Speed and its Impact
Your internet connection’s bandwidth is the primary determinant of your download speed. A higher bandwidth (measured in Mbps – megabits per second) translates directly to faster downloads. If you’re experiencing slow download speeds, checking your internet speed using online speed tests (many free options are available) is the first step. A slow speed might indicate a problem with your internet service provider (ISP), requiring you to contact them for troubleshooting.
Consider upgrading your internet plan if your current speed is consistently inadequate for your needs. Additionally, the time of day can influence speed; peak usage times often result in slower speeds.
Network Configuration Optimization
Beyond your internet connection, your network configuration plays a crucial role. Network congestion from other devices using your bandwidth (streaming videos, online gaming, etc.) can drastically reduce Adobe CC download speeds. Similarly, Wi-Fi interference from other electronic devices or physical obstacles (walls, furniture) can weaken your signal and slow down downloads. A wired Ethernet connection is generally faster and more stable than Wi-Fi, eliminating wireless interference.
Recommended Settings for Optimized Download Performance
Before initiating your download, consider these settings to improve performance.
- Close unnecessary applications: Free up system resources by closing applications not actively in use. This reduces competition for bandwidth and processing power.
- Prioritize the download: In your download manager (or within the Adobe Creative Cloud application itself), if possible, prioritize the Adobe CC download to ensure it receives sufficient bandwidth.
- Use a wired connection (Ethernet): If feasible, connect your computer directly to your router via an Ethernet cable. This avoids the inconsistencies and interference often associated with Wi-Fi.
- Disable other downloads and uploads: Pause any other downloads or uploads happening concurrently to dedicate your full bandwidth to the Adobe CC download.
- Restart your router and modem: A simple restart can often resolve temporary network glitches that might be impacting download speeds.
- Check for network conflicts: Multiple devices using the same IP address or conflicting network settings can create bottlenecks. Consult your router’s documentation or your ISP for assistance.
By understanding and implementing these optimization strategies, you can significantly improve your Adobe CC download speed, reducing wait times and getting back to creating sooner.
Understanding Adobe CC’s Terms of Use Related to Downloads

So, you’re ready to download Adobe Creative Cloud – awesome! But before you click that button, let’s quickly cover the legal stuff. Understanding Adobe’s Terms of Use is crucial to avoid any headaches down the line. It’s not the most exciting read, but it’s important to know what you’re agreeing to. Think of it as the fine print for your creative journey.Adobe’s Terms of Use regarding software downloads essentially boil down to this: you’re getting a license to use the software, not actually owning it.
This license is governed by specific conditions, and violating these conditions can have consequences. Basically, it’s a contract between you and Adobe outlining how you can and cannot use their software. Think of it like renting a really powerful apartment – you get to live there (use the software), but you can’t just tear down walls or sublet it without permission.
Key Aspects of Adobe’s Terms of Service
Adobe’s Terms of Service cover a wide range of issues related to the download and use of their software. This includes limitations on the number of devices you can install the software on, restrictions on sharing the software with others, and stipulations regarding acceptable use. They also Artikel the permitted methods of downloading the software and the responsibilities you have in ensuring the security of your downloaded applications.
For instance, you agree not to use the software for illegal activities or to reverse engineer it. Failure to comply with these terms can result in the termination of your subscription and potentially legal action.
Implications of Violating the Terms of Use
Violating Adobe’s Terms of Use can have serious repercussions. This could range from suspension or termination of your Adobe Creative Cloud subscription to legal action, including potential financial penalties. Sharing your Adobe CC software with unauthorized users, for example, is a direct violation of the terms of service and could result in account suspension. Similarly, using the software for purposes explicitly prohibited by the terms, such as unauthorized commercial distribution, could lead to significant legal consequences.
Think of it like breaking a lease agreement – it’s not just an inconvenience; it can have serious legal and financial ramifications.
Key Points to Understand Before Downloading
Before you download any Adobe CC application, it’s vital to understand these key points:
Understanding these points is crucial for a smooth and legally compliant experience with Adobe Creative Cloud. Ignoring them could lead to unexpected problems and potential penalties.
- You are licensing the software, not owning it.
- The number of devices you can install the software on is limited by your subscription plan.
- Sharing your Adobe CC account or software with others is strictly prohibited.
- You are responsible for maintaining the security of your downloaded applications and account.
- Using the software for illegal activities or unauthorized commercial distribution is a violation of the terms of service.
- Familiarize yourself with the full Adobe Terms of Use before downloading and using the software.
Conclusion
Downloading and installing Adobe Creative Cloud shouldn’t be a headache – it should be the first step towards your next amazing project! We’ve covered everything from choosing your download method and troubleshooting common issues to optimizing download speeds and understanding Adobe’s terms of service. Remember to always download from official sources and keep your software updated for the best experience.
Now go forth and create!
FAQ Resource
Can I download Adobe CC on multiple computers?
It depends on your subscription plan. Some plans allow installation on a limited number of devices, while others may have restrictions.
What happens if my Adobe CC subscription expires?
Once your subscription ends, you’ll lose access to the software. You can renew your subscription to continue using the apps.
How much storage space does Adobe CC need?
The amount of space needed varies depending on the apps you install and the projects you work on. It’s best to have a significant amount of free space on your hard drive.
Can I download individual apps instead of the entire Creative Cloud suite?
Yes, you can select individual apps to download through the Creative Cloud desktop app.
What if I encounter a corrupted download?
Try restarting the download. If the problem persists, contact Adobe support.