PreSonus Studio One: It’s the DAW everyone’s buzzing about, and for good reason. This isn’t your grandpappy’s recording software; Studio One packs a serious punch with its intuitive interface, powerful mixing capabilities, and surprisingly robust mastering tools. Whether you’re a seasoned pro or just starting your musical journey, Studio One offers a smooth workflow that’ll have you crafting killer tracks in no time.
Table of Contents
We’ll explore everything from basic project creation to advanced mixing techniques, so buckle up, music makers!
This guide will walk you through the essential features of PreSonus Studio One, from setting up your first project to mastering your final mix. We’ll cover importing audio, mixing techniques, mastering workflows, MIDI editing, automation, effects processing, and collaboration features. We’ll also tackle some common troubleshooting issues and delve into some advanced techniques to help you unlock the full potential of this incredibly versatile DAW.
PreSonus Studio One Interface Overview
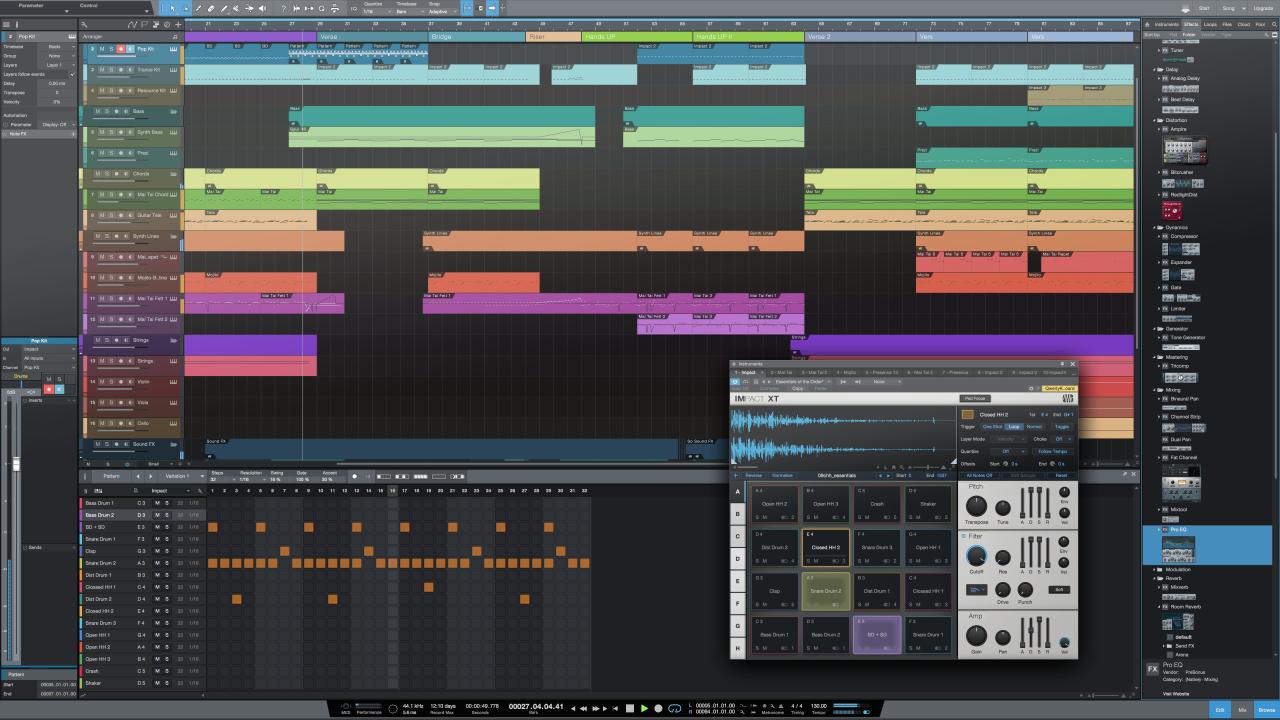
Studio One’s interface is designed to be intuitive and efficient, even for beginners. It boasts a clean, modern aesthetic, prioritizing ease of use without sacrificing powerful features. The arrangement of its various panels and windows is highly customizable, allowing users to tailor the workspace to their specific needs and preferences. This flexibility is a key strength, catering to diverse workflows and project complexities.The main workspace is divided into several key areas: the Browser, the Song page, and the Mixer.
The Browser provides quick access to your audio files, instruments, and effects. The Song page is where you arrange and edit your audio and MIDI data, and the Mixer allows you to control levels, panning, and effects for each track. Additional panels, such as the Inspector and the Events window, offer more detailed control over individual elements within your project.
The overall design aims for a streamlined workflow, allowing for efficient track creation, editing, mixing, and mastering.
Creating a New Project in Studio One
Starting a new project in Studio One is straightforward. First, you’ll click on the “File” menu, then select “New Song.” A dialog box will appear, allowing you to specify the project’s sample rate and bit depth. Common settings include 44.1 kHz and 24-bit for high-quality audio, but you can adjust these based on your project requirements and hardware capabilities.
You can also choose the tempo for your project in beats per minute (BPM). After confirming your settings, Studio One will create a blank project with a single audio track ready for you to begin recording or importing audio. The default settings are generally well-suited for most projects, but experienced users can fine-tune them for specific needs.
Importing Audio Files into Studio One
Importing audio files into Studio One is accomplished through the Browser panel. First, locate the “Browser” panel (usually on the left side of the screen). Then, navigate to the folder containing your audio files using the standard file browser within the panel. Once you’ve located your desired audio file(s), you can simply drag and drop them onto an empty track in the Song page.
Alternatively, you can right-click on the file and select “Add to Song.” Studio One will automatically create a new track if necessary and place the audio file on it. You can then adjust the file’s position, volume, and other parameters as needed using the tools in the Song page and Mixer. This drag-and-drop functionality, combined with the intuitive interface, makes adding audio files a quick and easy process.
Studio One’s Mixing Capabilities
Studio One’s mixing environment is incredibly powerful and intuitive, offering a streamlined workflow for even the most complex projects. Its flexibility allows for both quick, efficient mixing and deep, detailed manipulation of your audio, making it a favorite among both beginners and seasoned professionals. This section will explore some key aspects of Studio One’s mixing capabilities, focusing on aux sends, EQ and compression techniques, and the use of its built-in reverb and delay effects.
Studio One makes routing audio signals incredibly easy, primarily through the use of aux sends. These sends allow you to duplicate a signal from a track and send it to an aux channel for processing. This is crucial for tasks like adding reverb, delay, or other effects without altering the original track’s sound. You can even send multiple tracks to the same aux channel, creating a cohesive sound across different instruments or vocals.
Creating and Routing Aux Sends
Creating an aux send in Studio One is straightforward. First, select the track you want to send. Then, locate the send controls on the track’s mixer section. These usually appear as small knobs or faders labeled “Send A,” “Send B,” etc. Adjust the send level to control how much of the track’s signal is sent to the aux channel.
Next, create a new aux channel by clicking the “+” button in the mixer. Route the send by selecting the desired aux channel from the send’s destination menu. Now, you can apply effects like reverb or delay to this aux channel, impacting all tracks sent to it. The beauty of this system lies in its flexibility; you can create multiple aux channels for different effects, grouping tracks for specific processing, and maintaining control over individual track levels.
EQ and Compression Best Practices
Effective EQ and compression are fundamental to achieving a well-balanced and dynamic mix. In Studio One, both are handled through intuitive plugins. For EQ, the goal is typically to shape the frequency balance of each track, removing muddiness in the low frequencies, enhancing clarity in the midrange, and controlling harshness in the high frequencies. A common approach is to use high-pass filters to remove unnecessary low-end rumble from instruments and vocals, and then subtly boost or cut specific frequencies to enhance the desired characteristics of each sound.
For instance, a slight boost around 2kHz might add clarity to vocals, while a cut around 250Hz might reduce muddiness in a bass guitar.
Compression, on the other hand, controls the dynamic range of a signal. It reduces the difference between the loudest and quietest parts of a track, leading to a more consistent and powerful sound. Key parameters to adjust include threshold, ratio, attack, and release. The threshold determines the level at which compression begins. The ratio defines how much the signal is reduced once it exceeds the threshold.
Attack and release control the speed at which the compressor engages and disengages. Careful adjustment of these parameters is key to achieving natural-sounding compression, avoiding pumping or unnatural artifacts. For example, a fast attack and slow release might be suitable for a snare drum, while a slower attack and faster release might be preferred for vocals.
Using Studio One’s Built-in Reverb and Delay Effects
Studio One includes a range of high-quality reverb and delay effects. These are often used to add depth, space, and character to your tracks. Reverb simulates the acoustic environment of a space, adding ambience and spaciousness. Parameters like size, decay time, and diffusion control the character of the reverb. Experimenting with different reverb types, such as plate, hall, or room, can drastically alter the feel of a track.
For example, a large hall reverb might be suitable for a grand orchestral piece, while a smaller room reverb might be appropriate for a more intimate vocal performance.
Delay effects, on the other hand, create echoes or repetitions of a signal. Key parameters include delay time, feedback, and filter. Delay time determines the spacing between repetitions. Feedback controls how many repetitions occur, and the filter shapes the tonal character of the delayed signal. Delay can be used to create rhythmic effects, add depth, or even create unusual textural elements.
For example, a short delay with subtle feedback can add thickness to a guitar part, while a longer delay with more feedback can create a more dramatic effect.
Mastering with PreSonus Studio One

Okay, so you’ve got your killer mix in Studio One – congrats! Now it’s time to get that track ready for prime time, meaning mastering. Mastering is the final stage of audio production, where you polish your mix to make it sound its absolute best across various playback systems. It’s about making sure your track translates well from your studio monitors to car stereos, earbuds, and everything in between.
Think of it as the final, crucial layer of sonic glue.Preparing your mix for mastering is like prepping for a big presentation: you want everything polished and organized. This involves ensuring your mix is balanced and has enough headroom. Headroom is the space between the loudest parts of your mix and the digital ceiling (0dBFS). Leaving sufficient headroom prevents clipping during mastering, where the audio signal is abruptly cut off, leading to distortion.
Aim for a peak level around -6dBFS to -12dBFS, giving your mastering engineer some room to work their magic. Also, make sure your mix is free of any unwanted noise or clicks. A clean mix is a happy mastering engineer’s best friend.
Preparing a Mix for Mastering
Before sending your mix off to be mastered (or mastering it yourself!), a few key steps ensure a smooth process. First, perform a critical listen to identify any potential issues in your mix. Are there any frequency clashes? Is the overall balance pleasing? Are there any unwanted noises or artifacts?
Addressing these issues before mastering will save time and potential headaches down the line. Then, you’ll want to export your mix as a high-resolution WAV file. This preserves the audio quality and gives the mastering engineer (or you!) the best possible source material to work with. A common sample rate is 44.1kHz or 48kHz, and a bit depth of 24-bit is generally preferred.
Finally, before exporting, do a final check of your levels and make any necessary adjustments to ensure the mix is within the recommended headroom range.
Using Mastering Plugins
Studio One offers a robust selection of built-in and third-party mastering plugins. These plugins allow for subtle adjustments to your mix’s overall sound. For example, you might use a limiter to control the peak levels and prevent clipping. This ensures your track is loud enough without sacrificing dynamic range. A multiband compressor can target specific frequency ranges to add punch or warmth.
A subtle EQ can address any remaining frequency imbalances, while a stereo imager can widen or narrow the stereo field, depending on the desired effect. Remember, subtlety is key in mastering. Small adjustments can have a significant impact on the overall sound. Experimentation is encouraged, but always back up your project before making drastic changes!
Exporting a Mastered Track
Once you’ve applied your mastering plugins and are happy with the final sound, it’s time to export your mastered track. Again, export as a high-resolution WAV file at your chosen sample rate and bit depth (44.1kHz/48kHz, 24-bit is a safe bet). Consider also exporting a 16-bit version for wider compatibility. Make sure you name your file appropriately, including information such as the track title, artist name, and date.
For online distribution, you’ll likely need to convert your WAV file to a compressed format like MP3 or AAC. Studio One makes this easy with its export options, allowing you to specify the bitrate and other relevant parameters for the chosen format. Always double-check your export settings before hitting that render button!
MIDI Editing in Studio One
Studio One’s MIDI editor is a powerful tool for crafting and manipulating musical ideas. Whether you’re composing melodies, creating complex drum patterns, or programming intricate basslines, understanding its features is key to unlocking your creative potential. This section will Artikel a workflow for effective MIDI editing and using virtual instruments within the editor.
A typical workflow involves several key steps. First, you’ll create a MIDI track and select your desired virtual instrument. Then, you’ll input MIDI data using your MIDI keyboard or controller, recording your performance directly into the editor. After recording, you can edit your MIDI data using various tools, including note editing, quantization, velocity adjustments, and automation. Finally, you’ll refine your MIDI performance to achieve your desired sound and feel.
This process allows for iterative refinement, enabling you to build complex musical arrangements from simple ideas.
Using Virtual Instruments in Studio One’s MIDI Editor
Studio One seamlessly integrates with a wide range of virtual instruments (VIs). Once you’ve created a MIDI track, selecting a VI is straightforward. You simply choose your instrument from the “Instruments” section in the Studio One browser or by dragging and dropping a VI onto the MIDI track. The MIDI editor will then display the MIDI data, allowing you to see and edit the notes played by the VI.
The visual representation of notes and their properties (velocity, length, etc.) lets you make precise changes to the performance. You can adjust individual notes, or apply changes to groups of notes using various selection and editing tools. This visual feedback loop significantly streamlines the composition and arrangement process.
Optimizing MIDI Performance in Studio One
Optimizing MIDI performance in Studio One involves several strategies focused on improving both the sound and efficiency of your projects. One crucial aspect is proper quantization. Quantization aligns your MIDI notes to a specific grid, correcting timing inaccuracies and creating a cleaner, more professional sound. Experiment with different quantization settings to find what best suits your style and the feel of your music.
Another important consideration is velocity editing. Adjusting the velocity of individual notes can add expression and dynamics to your MIDI performances, making them sound more natural and engaging. Finally, using MIDI controllers effectively allows for real-time manipulation of parameters within your virtual instruments, adding another layer of expressiveness and control. For example, using a modulation wheel to control a filter cutoff or an expression pedal to shape the dynamics can greatly enhance the sonic quality.
Careful use of these techniques ensures your MIDI tracks sound their best and minimize processing strain on your system.
Studio One’s Arrangement Features
Studio One’s arrangement view is where the magic happens—it’s your digital canvas for crafting songs. Unlike some DAWs that feel clunky or overly complex, Studio One’s arrangement view prioritizes a clean, intuitive workflow, making it a favorite among both beginners and seasoned pros. We’ll dive into its features and compare it to other popular DAWs, showcasing its strengths.Studio One’s arrangement view distinguishes itself through its flexible and user-friendly approach to track management, editing, and arranging.
Compared to DAWs like Pro Tools, which can feel somewhat rigid in its track organization, or Ableton Live, which emphasizes clip-based arrangement, Studio One offers a hybrid approach that blends the best aspects of both. It allows for both linear arrangement and more flexible, non-linear workflows, making it adaptable to various compositional styles. Its drag-and-drop functionality and intuitive editing tools contribute to a smooth and efficient production process.
Arrangement View Features and Functions, Presonus studio one
The following table Artikels key features within Studio One’s arrangement view and their respective functions.
| Feature | Function | Comparison to Other DAWs | Example |
|---|---|---|---|
| Drag-and-Drop Editing | Easily move, copy, and paste audio and MIDI regions. | Similar to most DAWs, but Studio One’s implementation is particularly smooth and intuitive. | Moving a vocal section to a different part of the song simply involves dragging the region to the desired location. |
| Time Stretching and Pitch Shifting | Adjust the tempo and pitch of audio regions without significantly affecting audio quality. | Comparable to other DAWs’ features, but Studio One’s algorithms are generally well-regarded for their sonic preservation. | Adjusting the tempo of a drum loop to match the overall song tempo without affecting the drum sounds’ character. |
| Markers and Sections | Create markers to label specific points in your song and sections to organize larger portions. | Similar to other DAWs, but Studio One’s implementation allows for easy navigation and organization of complex projects. | Creating markers for intros, verses, choruses, and outros to quickly navigate the song during mixing and mastering. |
| Arrangement Tracks | Allows for non-destructive editing and grouping of multiple tracks. | Unique to Studio One, this feature simplifies complex arrangements by allowing for easy manipulation of multiple tracks simultaneously. | Grouping all the drums into an arrangement track for easier volume and panning adjustments. |
Creating a Complex Song Structure in Studio One
This step-by-step guide details how to build a complex song structure using Studio One’s arrangement features. This example assumes some familiarity with basic DAW operation.
- Song Setup: Begin by creating a new song, setting the tempo and time signature. Consider your overall song structure (verse, chorus, bridge, etc.) before starting.
- Track Creation: Create audio and MIDI tracks for your instruments and vocals. Consider using color-coding for organization.
- Section Creation: Using markers and sections, define distinct sections of your song (intro, verse 1, chorus, verse 2, etc.). This helps in organizing and navigating your project.
- Arrangement: Import or record your audio and MIDI data. Arrange the sections by dragging and dropping regions onto the timeline. Utilize Studio One’s powerful time-stretching and pitch-shifting tools to ensure seamless transitions.
- Arrangement Tracks: Group related tracks (like drums, vocals, etc.) into arrangement tracks for efficient volume and panning adjustments. This simplifies the mixing process significantly.
- Refining: Fine-tune your arrangement. Add transitions, adjust timing, and experiment with different arrangements until you achieve the desired effect. Use automation to create dynamic changes in volume, panning, and effects.
Automation in PreSonus Studio One
Studio One’s automation system is a powerful tool for shaping your mixes and adding dynamic movement to your tracks. It lets you control virtually any parameter of any plugin or track, giving you incredibly fine-grained control over your sound. Understanding how to use automation effectively is key to creating professional-sounding mixes.Automation in Studio One offers several methods for controlling parameters over time.
This allows for both subtle nuances and dramatic changes, enhancing the overall impact and interest of your music.
Types of Automation
Studio One offers two primary automation modes: Write and Read. Write mode allows you to record your parameter adjustments in real-time, capturing your movements as you tweak knobs and faders. Read mode, conversely, lets you visually draw or edit automation curves, providing precise control over the shape of your automation. This flexibility caters to different workflow preferences and creative approaches.
You can switch between these modes easily within the Studio One environment. Beyond these core modes, Studio One also supports clip-based automation, which allows for non-destructive editing and easy management of automation data.
Examples of Automation Enhancing a Mix
Imagine you have a vocal track. Using automation, you can subtly increase the reverb send during the chorus to create a wider, more spacious sound, then reduce it during the verses for a more intimate feel. Similarly, you could automate the volume of a synth pad to build intensity during a song’s climax, or use automation on an EQ to subtly adjust the frequencies of a bassline throughout the track to maintain its presence without muddying the mix.
Automation on a compressor’s threshold can dynamically control the amount of compression applied, allowing for more consistent levels without sacrificing dynamics. These examples demonstrate the versatility of automation to add depth, movement, and polish to your mix.
Creating and Editing Automation Clips
To create an automation clip, simply select the track parameter you want to automate (like volume, pan, or a plugin parameter). Then, click the automation lane in the track view. Studio One will automatically create an automation clip for that parameter. You can then use the mouse to draw your automation curve directly onto the clip. To edit an existing automation clip, simply click on the line and adjust the points along the curve.
You can add, delete, or move these points to fine-tune your automation. Studio One provides tools for smoothing out curves, creating sharp transitions, and other detailed adjustments. This level of control allows for precise shaping of your automation and avoids unwanted clicks or pops. Furthermore, you can copy and paste automation clips between tracks to easily apply similar automation patterns to multiple elements in your mix.
Studio One’s Effects Processing
Studio One comes packed with a solid selection of built-in effects, many of which hold their own against pricey third-party plugins. Understanding how to effectively use these tools is key to achieving a professional-sounding mix. This section will explore five key effects plugins included with Studio One and offer practical advice on their application.Studio One’s effects are integrated seamlessly into the workflow, making them easy to add, adjust, and automate.
Their intuitive interfaces make them accessible to both beginners and experienced users, while their sonic capabilities are surprisingly robust. The following will delve into specific examples, highlighting both their strengths and limitations.
EQ
Studio One’s channel EQ offers a flexible and intuitive approach to shaping the tonal balance of your tracks. It features a combination of parametric and shelving filters, allowing for precise adjustments to specific frequencies. You can easily boost or cut frequencies, adjust Q (bandwidth), and fine-tune the gain to achieve the desired sound. For example, using a high-shelf filter to subtly roll off harsh high frequencies in a vocal track can greatly improve its clarity and smoothness.
Compared to other DAWs, Studio One’s EQ is competitive, offering similar functionality to plugins found in Logic Pro X or Ableton Live, though it may lack some of the more advanced features of high-end plugins like FabFilter Pro-Q.
Compressor
The compressor in Studio One is a dynamic processor designed to control the dynamic range of a signal. It reduces the difference between the loudest and quietest parts of an audio signal, resulting in a more even and consistent level. This is crucial for achieving a balanced mix, especially when dealing with instruments or vocals that have a wide dynamic range.
Presonus Studio One’s workflow is pretty intuitive, but I’m curious how other users feel about it. To get a better sense of the user experience, I’m thinking of sending out a qualtrics survey to gather some feedback. The results will help me write a more comprehensive review of Studio One’s features and overall usability, hopefully making it easier for others to decide if it’s the DAW for them.
Effective compression can add punch, sustain, and glue to a mix. For instance, compressing a drum bus can make the drums sound more powerful and cohesive. Compared to other DAW compressors, Studio One’s offering provides a good balance of ease of use and sonic flexibility, similar to what you’d find in Pro Tools or Cubase.
Reverb
Studio One’s reverb plugin creates realistic ambient spaces for your tracks. It offers various reverb algorithms, each capable of simulating different acoustic environments, from small rooms to large halls. This is a vital effect for adding depth and dimension to your mixes, creating a sense of space and atmosphere. Using reverb subtly on vocals can add warmth and presence, while using it more heavily on instruments like guitars or synths can create a larger, more immersive sound.
Compared to other DAWs, Studio One’s reverb holds its own against similar plugins in other software, though dedicated reverb plugins like ValhallaRoom or Lexicon often offer more advanced features and customization options.
Delay
Delay effects add echoes to a signal, creating rhythmic patterns and interesting textural elements. Studio One’s delay plugin provides various delay types, including simple delays, ping-pong delays, and more complex modulated delays. These can be used to add subtle rhythmic interest to a track or to create more pronounced effects, such as rhythmic echoes or slap-back delays on vocals.
Using delay creatively can add movement and groove to your music. Similar to its other effects, Studio One’s delay is comparable to those found in other DAWs; its functionality is solid, but dedicated delay plugins from companies like Eventide often offer a wider array of features and more unique sonic character.
Chorus
The chorus effect thickens and widens a sound by creating multiple slightly detuned copies of the original signal. Studio One’s chorus plugin offers controls for adjusting the depth, rate, and mix of the chorus effect. This can add fullness and richness to instruments or vocals, particularly useful for enhancing lead vocals or adding shimmer to pads. For example, applying a subtle chorus to a lead vocal can add warmth and body, while a more pronounced chorus can create a dreamy, ethereal effect.
Studio One’s chorus is on par with similar plugins found in other DAWs, offering a good balance of functionality and ease of use.
Collaboration Features in Studio One: Presonus Studio One

Studio One offers several robust features designed to streamline collaborative workflows, making it easier for multiple users to work on the same project simultaneously, or to efficiently share and merge individual contributions. These tools significantly reduce the friction often associated with group projects, fostering a more efficient and enjoyable creative process.Studio One’s collaboration capabilities primarily revolve around project sharing and version control.
While it doesn’t offer real-time co-editing like some other DAWs, its methods for sharing and merging projects are well-suited for team-based music production.
Project Sharing Methods
Studio One provides several ways to share projects for collaboration. The simplest method involves exporting the project as a zipped archive, including all audio files and associated data. This method is straightforward but lacks version control, potentially leading to confusion if multiple versions of the project exist. A more advanced option involves using cloud storage services like Dropbox, Google Drive, or OneDrive.
This allows for easy sharing and version history tracking, though managing file sizes can become a challenge for large projects. Finally, Studio One’s ability to export stems (individual tracks or groups of tracks) enables focused collaboration, where team members can work on specific sections of a project independently before merging them back into the main project file.
Merging Collaborative Work
The process of integrating individual contributions involves careful management of project versions. The simplest scenario involves one person consolidating changes from multiple collaborators. This person would open the main project file and import the individual tracks or sections contributed by others. Careful attention must be paid to track naming conventions and avoiding conflicting automation or effects assignments.
More complex scenarios might necessitate using a version control system external to Studio One, particularly for projects involving a large number of collaborators or frequent revisions. A good practice is to maintain clear communication between collaborators regarding changes and revisions to minimize potential conflicts.
Conflict Resolution
Inevitably, conflicts can arise during collaborative projects. These might involve differing automation settings, competing edits to the same track, or conflicting versions of the same audio file. A clear workflow is crucial to resolving these issues. The first step is thorough communication; collaborators should discuss their changes and identify areas of conflict. In Studio One, the most straightforward way to resolve these conflicts often involves comparing the different versions of the project (if version control is used) or comparing the individual tracks involved in the conflict.
The person responsible for merging the project must then decide which version to keep, or find a way to combine elements from multiple versions to create a cohesive result. This process requires careful listening and judgment to maintain the artistic integrity of the project.
Studio One’s Sound Library and Content
Studio One comes equipped with a pretty solid built-in sound library, offering a decent starting point for various musical styles. It’s not going to blow your mind with the sheer quantity of some massive sample packs, but it provides a good range of instruments and sounds to get you going, especially if you’re just starting out. Think of it as a well-stocked toolbox – you’ve got the essentials, but you’ll likely want to expand it over time.The included library offers a selection of virtual instruments, loops, and samples.
You’ll find a mix of acoustic and electronic instruments, including drums, bass, keyboards, guitars, and orchestral instruments. The quality is generally good, though some sounds might sound a bit generic compared to high-end commercial libraries. The loops are a nice addition, providing quick starting points for building tracks, and the samples are useful for adding texture and detail.
The overall usability is excellent; everything is well-organized and easily accessible within the Studio One interface.
The Content of Studio One’s Sound Library
Studio One’s core sound library provides a foundation of useful sounds. It’s not exhaustive, but it’s definitely sufficient to create a wide range of musical styles. The selection includes various drum kits (acoustic, electronic, and hybrid), a collection of sampled instruments (pianos, strings, brass, woodwinds), and a selection of synthesized instruments, covering pads, leads, and bass sounds. Many of the sounds are designed to be versatile and blend well together, facilitating quick and easy composition.
The inclusion of loops also simplifies the process of building a track’s rhythmic and melodic foundation. While not a replacement for dedicated sample libraries, the built-in library provides a solid base for beginners and a convenient resource for experienced users.
Expanding the Sound Library
There are several avenues to expand your Studio One sound library beyond what’s included by default. PreSonus offers additional content packs directly through their website, often at a reasonable price. These packs usually focus on specific genres or instrument types, allowing you to tailor your library to your musical needs. Many third-party developers also create virtual instruments and sample libraries compatible with Studio One.
These offer a wider variety of sounds and often higher quality than the built-in options, but they come at a cost. You can find these libraries on websites specializing in virtual instruments and samples. Finally, you can always record your own sounds and import them into Studio One, creating a personalized library of custom instruments and samples.
This route requires more effort but allows for complete creative control.
Organizing and Managing an Expanded Sound Library
As your library grows, effective organization becomes crucial. Studio One allows you to create custom folders within the Sound Library browser, enabling you to categorize your sounds by instrument type, genre, or any other system that works for you. Consistent naming conventions for your imported samples and instruments are also essential. Consider using a system that reflects the instrument type, key, and tempo (e.g., “AcousticPiano_Cmaj_120bpm”).
Regularly auditing your library and deleting unused sounds will prevent clutter and improve performance. The “search” function in Studio One’s browser can also help you quickly locate specific sounds. Employing a combination of these organizational strategies will keep your library manageable and efficient even as it expands significantly.
Troubleshooting Common Studio One Issues

Okay, so you’re rocking Studio One, but sometimes it throws you a curveball. Let’s be real, even the best DAWs have their quirks. This section dives into some common problems and how to fix them, saving you precious studio time and preventing hair-pulling moments. Think of this as your Studio One survival guide.
Audio Interface Issues
Dealing with audio interface problems is a common headache for music producers. These issues can range from a complete lack of audio input or output to unexpected latency or crackling sounds. A stable connection is crucial for a smooth workflow. Troubleshooting these issues usually involves checking physical connections, driver updates, and buffer settings.
- No Audio Input/Output: Check all cable connections between your interface, computer, and monitors. Make sure your interface is properly powered on and selected as the input/output device in Studio One’s audio settings. If the problem persists, reinstall your audio interface drivers. Sometimes, a simple restart of your computer can also resolve the issue.
- High Latency/Crackling Audio: High latency means a delay between playing and hearing the sound, while crackling indicates audio glitches. To address these issues, reduce the buffer size in your audio interface settings. However, lowering the buffer size too much can cause your computer to overload, so find a balance. Closing unnecessary applications and increasing your computer’s RAM can also improve performance.
- Interface Not Recognized: If Studio One doesn’t recognize your interface, ensure it’s properly installed and that the correct drivers are installed. Check your computer’s device manager to see if the interface is listed and functioning correctly. If not, try reinstalling the drivers or contacting the manufacturer for support.
Plugin Issues
Plugins are essential for adding effects and instruments to your projects, but they can sometimes cause crashes or unexpected behavior. This section Artikels how to identify and solve plugin-related problems in Studio One.
- Plugin Crashes: If a specific plugin consistently crashes Studio One, try bypassing it to see if the problem is resolved. If so, the plugin itself is likely faulty. Try updating the plugin to the latest version, or contacting the plugin developer for support. In some cases, reinstalling the plugin might help. As a last resort, you may need to replace the plugin altogether.
- Plugin Not Showing Up: Ensure that the plugin is installed correctly and that Studio One’s plugin scan has been completed. You may need to manually add the plugin’s directory to Studio One’s plugin paths. If the plugin is a VST3, make sure that Studio One is configured to load VST3 plugins.
- Plugin Conflicts: Sometimes, plugins can conflict with each other, leading to unexpected behavior or crashes. Try disabling plugins one by one to identify the culprit. If you identify a conflict, consider using alternative plugins or contacting the developers of the conflicting plugins for assistance.
Project File Corruption
Sometimes, your Studio One project files can become corrupted, leading to unexpected behavior or crashes. This section provides methods to recover corrupted projects or prevent corruption in the future.
- Project File Won’t Open: If Studio One can’t open a project file, try creating a new project and importing the audio files and MIDI data from the corrupted project. This might salvage the project’s content, even if the original project file is unusable. Always regularly back up your projects to an external drive.
- Project File Instability: If a project is unstable and prone to crashing, try consolidating all audio files into the project. This reduces the number of files Studio One needs to manage. You can also try reducing the number of plugins used in the project.
Unexpected Program Behavior
Sometimes, Studio One might exhibit unexpected behavior, such as freezing, slow performance, or unexpected errors. This section provides general troubleshooting steps to resolve these issues.
- Studio One Freezing/Crashing: Try closing unnecessary applications running in the background. Ensure your computer meets the minimum system requirements for Studio One. Consider increasing your computer’s RAM or upgrading your hard drive to an SSD for improved performance. If the problem persists, try reinstalling Studio One.
- Slow Performance: Studio One can become slow if your computer is overloaded or if the project is too complex. Close unnecessary applications, reduce the number of tracks and plugins in your project, and consider upgrading your computer’s hardware.
Storage Space Issues
Running out of hard drive space is a common issue that can lead to performance problems and even prevent Studio One from running.
- Insufficient Disk Space: Studio One requires sufficient hard drive space to operate effectively. Free up space by deleting unnecessary files, moving large files to an external drive, or upgrading to a larger hard drive. Regularly check your disk space to prevent future issues.
Advanced Techniques in Studio One
Studio One, while user-friendly, offers a powerful suite of advanced tools for experienced producers and engineers. This section dives into sophisticated mixing, mastering, and routing techniques to elevate your productions to a professional level. We’ll explore methods beyond the basics, focusing on techniques that will significantly impact the final sound of your mixes and masters.
Advanced Mixing Techniques
Beyond basic EQ and compression, advanced mixing involves nuanced control over dynamics, stereo imaging, and subtle sonic details. Mastering phase coherence, for instance, is crucial for a tight, powerful low-end. This involves carefully analyzing the phase relationships between tracks, particularly bass and kick drum, using tools like Studio One’s phase meter. Incorrect phase alignment can result in a thin or muddy low-end, while proper alignment delivers punch and clarity.
Another key technique is parallel processing, where a copy of a track is heavily processed (e.g., with saturation or distortion) and then blended back with the original to add character and depth without overly affecting the overall dynamics. This can add punch to drums or warmth to vocals. Finally, using advanced automation to subtly shape the dynamics and movement of your mix over time can add life and interest, moving beyond simple fader rides.
Advanced Mastering Techniques
Mastering in Studio One goes beyond simply applying a limiter. It’s about optimizing the overall balance, dynamics, and loudness of your track for various playback systems. Advanced mastering involves detailed spectral balancing using EQ, targeting specific frequencies to address muddiness, harshness, or lack of clarity. This requires a critical ear and understanding of how different frequencies interact.
Multiband compression can be used to dynamically control different frequency ranges independently, allowing for precise control over the overall dynamic range. For example, compressing the low-end more aggressively than the high-end can add punch and definition. Mid-side processing offers another layer of control, allowing you to independently process the mono and stereo components of your mix. This can be used to create a wider stereo image or enhance the impact of the center channel.
Finally, careful attention to dithering and bit-depth conversion is crucial for ensuring that the final mastered track is free of artifacts and retains its sonic integrity.
Advanced Routing and Signal Processing
Studio One’s flexible routing capabilities allow for complex signal flows, enabling creative effects processing and mix control. One advanced technique is using aux sends and returns to create parallel processing chains, such as a dedicated reverb send for specific instruments, or a separate bus for drum compression. This organized approach keeps the main mix cleaner while providing individual control over effects.
Another example is using group tracks to manage multiple instruments or elements of a mix. This simplifies the mix by allowing for overall level and processing adjustments to multiple tracks simultaneously. Advanced routing also allows for the use of external hardware effects processors. By configuring Studio One’s inputs and outputs, you can integrate external gear like compressors, EQs, or reverbs into your workflow.
This adds flexibility and can bring the character of high-end hardware into your productions. Lastly, the use of sophisticated plugins, such as dynamic EQs and multiband compressors, offers precise control over the frequency and dynamic response of individual tracks or groups. These tools require a more advanced understanding of audio engineering principles but can dramatically enhance the sonic quality of your work.
Wrap-Up

So, there you have it – a whirlwind tour through the amazing world of PreSonus Studio One. From its user-friendly interface to its powerful features, Studio One proves itself a top contender in the DAW arena. Whether you’re a bedroom producer or a seasoned studio veteran, Studio One’s flexibility and power will help you take your music to the next level.
Go forth and create!
Commonly Asked Questions
Is PreSonus Studio One good for beginners?
Totally! Its intuitive interface and straightforward workflow make it incredibly beginner-friendly. Plus, there’s a ton of online resources and tutorials to help you along the way.
How much does PreSonus Studio One cost?
PreSonus offers different versions at various price points. Check their website for the latest pricing and options.
Can I use PreSonus Studio One on a Mac and PC?
Yep! Studio One is available for both macOS and Windows.
What are the system requirements for PreSonus Studio One?
Check the PreSonus website for the most up-to-date system requirements. Generally, you’ll need a reasonably modern computer with sufficient RAM and processing power.
Does PreSonus Studio One integrate with other plugins?
Absolutely! Studio One supports VST, AU, and AAX plugins, giving you access to a massive library of third-party effects and instruments.